Deploying Docker Compose Applications with Tailscale and GitHub Actions
How to use Tailscale SSH and GitHub Actions to continuously deploy docker compose applications to private machines — no public ports, no key management.
Intro
Over the past year or so we’ve built out a decent-sized test lab environment for Akka.NET and I’ve also personally started a small homelab environment for creating some useful services for my family’s use. Both of these networks use the same components:
- Tailscale for secure networking and
sshaccess; docker composefor running infrastructure services such as databases or observability tools; and- In our corporate environment we use Kubernetes for running our application workloads; typically, we use GitHub Actions and a self-hosted Docker registry inside our VPN for continuously deploying these.
However, I ran into the same issue with my homelab and my corporate network this week: I needed to be able to continuously deploy a docker compose application onto just one of my machines. For our work use-case; it’s because we’re conducting a pretty big beefy load test and I need control over which node is going to be hosting the “victim” process that’s going to get blasted by everyone else1.
In this article I’m going to show, briefly, how to use GitHub Actions and Tailscale to continuously deploy docker compose applications.
Workflow
Here’s what I want to be able to do with these tools:
sequenceDiagram
    participant Dev as Developer
    participant CI as CI/CD Pipeline
    participant Reg as Private Registry
    participant Host as Docker Compose Host

    Dev->>CI: Modify application / push changes
    CI->>CI: Build new application image
    CI->>Reg: Publish image to private registry
    CI->>Host: Trigger Docker Compose update
    Host->>Reg: Pull latest image
    Host->>Host: Update services to latest version
Pushing new images to a private container registry is relatively easy to do. The real key is automating the docker compose update. With Kubernetes we can easily do this via a kubectl command or by pushing a new Helm chart. How do we get docker compose to behave similarly?
Why Tailscale?
I have a confession to make: I love Tailscale. If you’re not familiar with it: Tailscale is a lightweight networking tool built on top of the WireGuard to make it very, very, very easy to create your own virtual private networks for both personal and professional use. We call these a “tailnet” - short for “Tailscale network.”
I use a free Tailscale account for my personal homelab and I purchased a Tailscale Starter plan for our small team at Petabridge. It’s great - we use the Tailscale Kubernetes operator inside our two K8s clusters (ARM and x64) and for my personal use, I’ve even developed a Pulumi application that lets me create Tailscale exit nodes on Digital Ocean micro-VMs when I’m traveling abroad: https://github.com/Aaronontheweb/tailscale-pulumi
So why is Tailscale relevant in the context of deploying applications via docker compose? For the following reasons:
- We’re going to use Tailscale SSH - this allows me to connect to any of my Tailscale servers via
sshwithout having to pass authentication keys around. Tailscale’s Access Control List (ACL) does the securing for us. - All of our servers run on private DNS / IP addresses with none of their ports exposed publicly - Tailscale’s VPN functions as an overlay network and makes these addresses resolvable via the Tailscale daemon running on each of the target services.
- We’re going to pass in a Tailscale OAuth client id and secret - this is what will allow Tailscale to spin up an ephemeral device inside GitHub Actions that it can use to connect to my private tailnet.
If you want to do all of this without Tailscale - you can do this with regular, old
sshkeys and public ports instead. Please see Sebastian Scheibe’s: “Automated Docker Compose Deployment with GitHub Actions” to see how to do this. His post is where I got the idea to do this with Tailscale.
GitHub Actions
Putting everything together, we need to:
- Login to our tailnet;
- Build and push our docker images; and
- Make sure the latest docker image tag gets pushed into our
docker composeapplication.
Here’s the full GitHub Actions file I used for this:
Let’s break this down into its component parts.
docker-compose.yml and .env Files
Our project is structured accordingly:
.
├── Directory.Build.props
├── Directory.Packages.props
├── NuGet.Config
├── README.md
├── RELEASE_NOTES.md
├── StannardLabs.slnx
├── build.ps1
├── coverlet.runsettings
├── docker
│             └── docker-compose.yaml
│             ├── .env
├── global.json
├── scripts
│             ├── bumpVersion.ps1
│             └── getReleaseNotes.ps1
└── src
    └── Site
        ├── ...
For CI/CD purposes, only the ./docker folder is of interest to us - the rest of the projects’ contents are all for publishing the docker images.
Here’s what our docker-compose.yaml looks like:
services:
  stannardlabs-site:
    image: docker.homelab.stannardlabs.com/stannardlabs-site:${DOCKER_TAG}
    restart: unless-stopped
    env_file:
      - .env
    environment:
      - OTEL_EXPORTER_OTLP_ENDPOINT=http://collector:4317
      - OTEL_RESOURCE_ATTRIBUTES=service.namespace=stannardlabs-site,service.instance.id=site-1
      - OTEL_SERVICE_NAME=stannardlabs
    ports:
      - "9982:8080" #default ASP.NET Core port
And here’s our .env file:
DOCKER_TAG=1.0.1
The key details here:
${DOCKER_TAG}- this is going to pull theDOCKER_TAGenvironment variable from one of theenv_filesources we specified..env- this is the file that sets theDOCKER_TAGvalue. This is what we’re going to update during deployments.
Logging into Our Tailnet
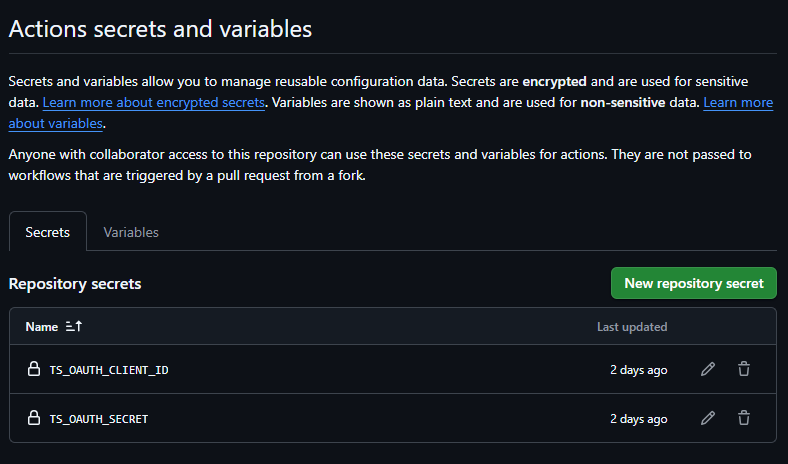
The first step is to login to our Tailnet - we’re going to do this using tailscale/github-action@v3 and using Tailscale OAuth credentials saved as GitHub Actions Secrets.
Tailscale Auth and ACL
Now, one very crucial detail: the Tailscale tag we automatically apply to all of the ephemeral devices created using this OAuth client id:
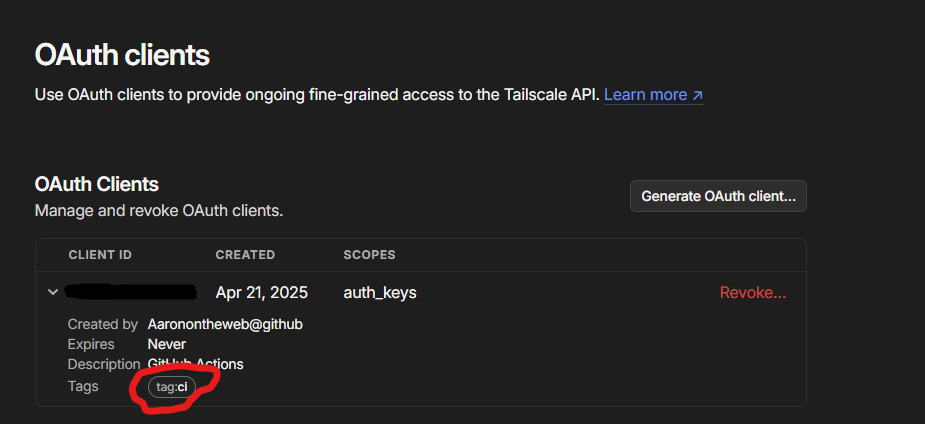
We are tagging all of our GitHub Actions clients with the tag:ci. This is important because the way we’ve defined our Tailscale ACL file, tag:ci devices have the ability to ssh into tag:server resources:
{
// rest of policy file....
"tagOwners": {
		"tag:server": [
			"autogroup:admin",
		],
		"tag:router": [
			"autogroup:admin",
		],
		"tag:ci": [
			"autogroup:admin",
		],
	},
	"ssh": [
		// Allow all users to SSH into their own devices in check mode.
		// Comment this section out if you want to define specific restrictions.
		{
			"action": "check",
			"src":    ["autogroup:member"],
			"dst":    ["autogroup:self"],
			"users":  ["autogroup:nonroot", "root"],
		},
		{
			"action": "accept",
			"src":    ["autogroup:admin", "tag:ci"],
			"dst":    ["tag:server"],
			"users":  ["root"],
		},
	],
}
Otherwise, ssh access will be denied even if we successfully connect to our tailnet.
Worth noting: the default Tailscale permissions are fairly broad, so you probably won’t even run into this issue on a new account. I run my tailnet with more restrictive permissions by default, as do many other production users, so your mileage may vary.
Building and Publishing Docker Images
This part is specific to your application. In our applications we typically use the .NET SDK’s built-in container publishing support and we use the build.ps1 script to parse the container image version, which matches the from a RELEASE_NOTES.md file2.
When we invoke the following:
dotnet publish -p:ContainerRegistry={your container registry uri} -c Release -t:PublishContainer
That’s going to build and publish this image using the git tag we’ve pushed as the version number to our registry.
Now it’s worth noting: our Docker registry is part of our tailnet! That’s why we’re not doing a separate docker login step first. We don’t require authentication on our registry because it’s inaccessible outside our network. The Tailscale login takes care of that for us.
Updating docker compose
So after we login to Tailscale and push our Docker image to the registry, it’s time for the final step: getting docker compose to use it.
Thus, we do the following via ssh and scp:
# Copies the docker-compose file first, then updates the .env file that sets the image version
- name: Deploy to server
  run: |
    scp -o StrictHostKeyChecking=no -o UserKnownHostsFile=/dev/null ./docker/docker-compose.yaml ${ vars.SSH_USER_NAME }@${ vars.TARGET_NODE }:${ vars.SSH_TARGET_DIRECTORY }
    ssh -o StrictHostKeyChecking=no -o UserKnownHostsFile=/dev/null $@$ << 'EOF'
      cd ${ vars.SSH_TARGET_DIRECTORY }
      sed -i 's/^DOCKER_TAG=.*/DOCKER_TAG=$/' .env
      docker compose up -d
    EOF
We disable StrictHostKeyChecking and the UserKnownHostsFile to avoid any sort of interactive prompts where we might get asked about accepting keys and blah blah. That’s the first step.
Second step: our docker-compose.yaml file has to live in a stable target directory on the target machine. I usually pick something inside the SSH_USER_NAME’s folder but you could use a shared volume if the user has access to that.
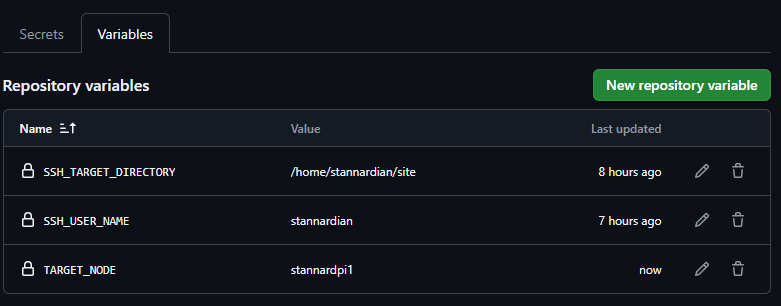
This value, SSH_TARGET_DIRECTORY, is defined as a GitHub Actions variable:
Next, we copy the docker-compose.yaml file over. You don’t have to explicitly do this - you could just copy the file over manually beforehand. But the reason why I do this is because if I change the content of the docker-compose.yaml file, why not deploy that too while we’re at it?
And then finally, we use sed to inject our new DOCKER_TAG value into the .env file and then tell docker compose up -d to pull the new image and relaunch it. docker compose up -d is the standard command to update a running docker compose application – it detects which services have changed, pulls updated images, and restarts only those containers without taking the whole stack down.
Running It
Once you put this all together, you now have a continuous deployment pipeline for docker compose!
Let’s see what it looks like in action:
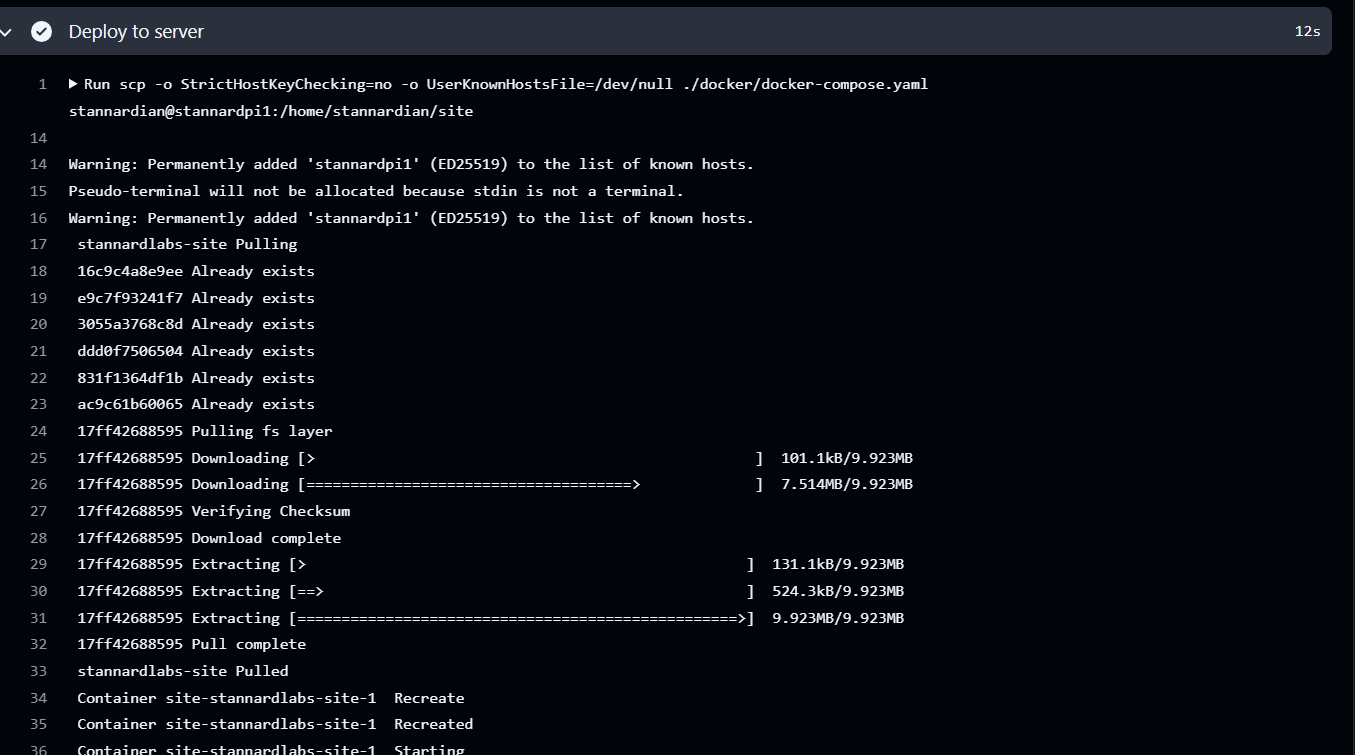
Boom! It works.
-
We’re not worried about container overhead being a relevant factor in this test. If it is, I can easily retool the deployment process I outline in this article to ship a self-contained .NET executable instead. ↩
-
The build template we use for these scripts et al can be found here: https://github.com/akkadotnet/build-system-template ↩
Discussion, links, and tweets
I'm the CTO and founder of Petabridge, where I'm making distributed programming for .NET developers easy by working on Akka.NET, Phobos, and more..
Tweet Follow @Aaronontheweb