How to Build a Real-Time Chat Service with Socket.IO, Express, and the Azure SDK–Part 2: Setting Up Express and Session-Handling
- Step 1: Install Express and its dependencies
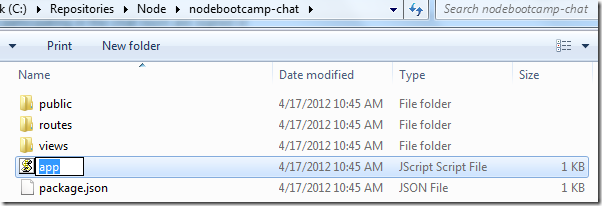
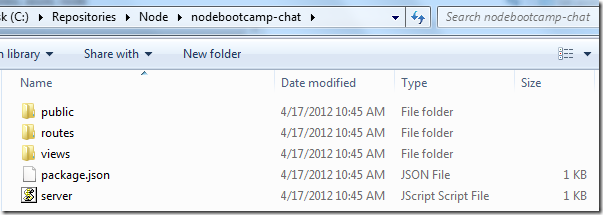
- Step 2: Rename app.js to server.js
- Step 3: Set up cookie-sessions to be the Express session provider
- Step 4: Create route helpers to enforce authentication rules and activate session cookies
- Step 5: Create Express routes and views
So if you read part 1 of this series, then you’ve had a chance to grok the requirements for our little chat service and see all of the NPM packages and front-end tools we’re going to use for building it. In this portion I’m going to explain how to set up Express and all of the session-handling requirements we have.
If you recall from the previous post, we need to ensure that all users participating in the chat room are signed in with a registered chat handle before they can participate. We’re going to accomplish that using the Express web framework and its rich user-session support.
Step 1: Install Express and its dependencies
The first thing we need to do is install Express itself, which is pretty straightforward – do the following:
1: $ npm install -g express
2: $ express nodebootcamp-chat
3: $ cd nodebootcamp-chat
4: $ npm install
Notice that I use the npm install –g command – that installs Express globally and makes it accessible to 100% of Node projects on my local system; this is convenient because it allows you to use Express’ scaffolding for creating new websites without having to install Express first each and every time.
Step 2: Rename app.js to server.js
Windows Azure’s Node runtime looks for an entry point to your application with the filename server.js in the root directory; Express’ default entrypoint file
Step 3: Set up cookie-sessions to be the Express session provider
We’re going to use cookie-sessions as our cookie mechanism for our chat application because it doesn’t require us to set up a Redis / MongoDB session store.
So I added cookie-sessions to my package.json file and modified the top of server.js accordingly:
1: var express = require('express')
2: , routes = require('./routes')
3: , http = require('http')
4: , sessions = require('cookie-sessions');
5:
6: var app = express();
7:
8: app.configure(function(){
9: app.set('views', __dirname + '/views');
10: app.set('view engine', 'jade');
11: app.use(express.favicon());
12: app.use(express.logger('dev'));
13: app.use(express.static(__dirname + '/public'));
14: app.use(express.bodyParser());
15: app.use(sessions({secret: 'A UNIQUE SESSION KEY'}));
16: app.use(express.methodOverride());
17: app.use(app.router);
18: });
This code imports the cookie-sessions module (line 4) so we can use it anywhere inside of server.js, and then sets it as the official session provider throughout all requests handled by the Express server (line 15).
In order to leverage the session provider you have to call app.use(sessions({….})) before the app.use(app.router) is called – any Express configuration that isn’t set before the call app.router to effectively gets ignored since app.router intercepts all requests and does the actual handling from that point onward, and all of these configuration options are loaded in sequential order.
Session Secrets
One small thing to point out:
15: app.use(sessions({secret: 'A UNIQUE SESSION KEY'}));
The session key string that we’re using is used to create a secure two-way hash so the cookies can only be decrypted by your application. You can set this secret string to be anything – I typically use a uuid.
Bear in mind that if you change this session key after your application has been deployed that you’ll no longer be able to decrypt any previously-assigned cookies, so all of your users will have to log out and log back in again.
Step 4: Create route helpers to enforce authentication rules and activate session cookies
Now that we have session support via cookie-sessions, we have to do two things to leverage it in our project:
- Create a helper that ensures that the cookie is instantiated any time we need to write to it and
- Create a helper that checks for all authenticated requests.
- The first bullet point here really addresses a quirk with cookie-sessions: the req.session object in all Express instances where you’re using cookie-sessions will be null by default, so anytime you try to assign a property to it like req.session.username = “value” you can run into an exception.
- So what we’re going to do here is create a request helper that will automatically instantiate the session any time we need to write to it. Here’s what that function looks like when it’s defined in helpers/initializeSession.js:
1: /* Helper function that ensures that our HTTP session cookie is alive */
2: exports.initializeSession = function (req, res, next) {
3: console.log("Checking session");
4: if(typeof(req.session) == 'undefined'){
5: req.session = {};
6: console.log("Session initialized");
7: }
8: next();
9: }
- I’ll show you how we use this in the context of routes in a second.
- Next we’re going to create a similar function for checking if a chat user has a handle stored in their session already – if they don’t, we need to redirect them to a login page where they can go get one. If they do already have a chat handle, then we can let them into the chat room.
- Here’s what that code looks like in helpers/requireLogin.js:
1: /* Helper function that ensures that creates a redirect for protected areas */
2: exports.requiresLogin = function(req, res, next) {
3: if(req.session && req.session.userName && req.session.userName.length > 0) {
4: next();
5: } else {
6: res.redirect('/user/login?redir=' + req.url);
7: }
8: }
- Let’s set up the routes we need to handle all of this next.
Step 5: Create Express routes and views
- So the next thing we need to do is set up some routes and views – we already have an index route / view and we’ll use that one for our chatroom, but we need a pair of routes and views for our login semantics.


