How to Automatically Utilize Multicore Servers with Node on Windows Azure
- Adding Startup Tasks to Node Projects
One major advantage of developing Node applications for Windows Azure is the ability to have your Node apps managed directly by IIS via iisnode.
You can read more about the benefits of iisnode here, but I want to call out these two points specifically from the iisnode wiki:
Scalability on multi-core servers. Since node.exe is a single threaded process, it only scales to one CPU core. The iisnode module allows creation of multiple node.exe processes per application and load balances the HTTP traffic between them, therefore enabling full utilization of a server’s CPU capacity without requiring additional infrastructure code from an application developer.
Process management. The iisnode module takes care of lifetime management of node.exe processes making it simple to improve overall reliability. You don’t have to implement infrastructure to start, stop, and monitor the processes.
Scalability on multicore servers with Node typically requires developers to use the Node cluster module and write some code which spawns one node.exe process per available processor and write your own handlers for what to do in the event of a failed process and so forth.
Update: It occurred to me after I initially published this that many developers may not understand the need for multiple node.exe processes. If you read through my “Intro to Node.JS for .NET Developers“ you’ll get a better sense for how Node works under the hood – the gist of it is that Node handles all incoming HTTP requests on a single thread, and thus can only utilize a single core at any given time regardless of the number of available processors. Having multiple Node.exe processes handling HTTP requests allows for multiple event loop threads, all of which can be run in parallel across different processors. That’s why this technique is important for multicore systems.
IIS and iisnode can take care of this for you automatically without you having to write any code to do it (a good thing,) and on Windows Azure you can automate this via startup task (fork the source on Github:)
if "%EMULATED%"=="true" exit /b 0

REM Count the total number of available processors on this system
powershell -c "exit [System.Environment]::ProcessorCount"

REM set the default number of processes for our app pools in IIS equal to the
number of available processors
%windir%\system32\inetsrv\appcmd set config -section:applicationPools
-applicationPoolDefaults.processModel.maxProcesses:%ErrorLevel%
This startup task automatically determines the number of available processors on the CPU and tells IIS to set the number of worker processes in your Node application pools to use one process-per-core, thus allowing your Node applications to take advantage of every core on the system.
Adding Startup Tasks to Node Projects
If you want to use this startup task in your Node project, follow these steps:
- Save the script above into a .cmd or .bat file – I added the file to my azure-webrole-performancescripts project on Github if you want to grab a copy of the setMaxProcessesToAvailableProcessors.cmd file from it.
- Copy the setMaxProcessesToAvailableProcessors.cmd file into your [AzureNodeServiceRoot]/[NodeWebRole]/bin folder – this is the directory you want to work from whenever using startup tasks with node.
- The last thing you need to do is just include the startup task in your ServiceDefinition.csdef file, located in the root of your Node Azure Service. The Startup section of the file should look like this:
<Startup>
  <!-- Included by default; installs everything you need to run Node on Azure -->
  <Task commandLine="setup_web.cmd" executionContext="elevated">
    <Environment>
      <Variable name="EMULATED">
        <RoleInstanceValue xpath="/RoleEnvironment/Deployment/@emulated" />
      </Variable>
    </Environment>
  </Task>
  <Task commandLine="setMaxProcessesToAvailableProcessors.cmd"
    executionContext="elevated">
    <Environment>
      <Variable name="EMULATED">
        <RoleInstanceValue xpath="/RoleEnvironment/Deployment/@emulated" />
      </Variable>
    </Environment>
  </Task>
</Startup>
Once all of this is setup, go ahead and deploy your Node service to Azure and it will be able to take advantage of all of the cores on the VMs. The script will dynamically scale with the size of your role instance, so there is no need to alter it.
To verify that the script worked:
- RDP into one of your Node + Azure instances;
- Go to IIS Manager from the Windows Menu;
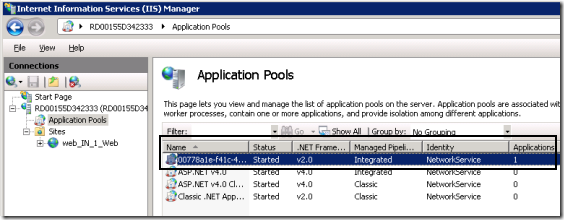
- Go to Application Pools;
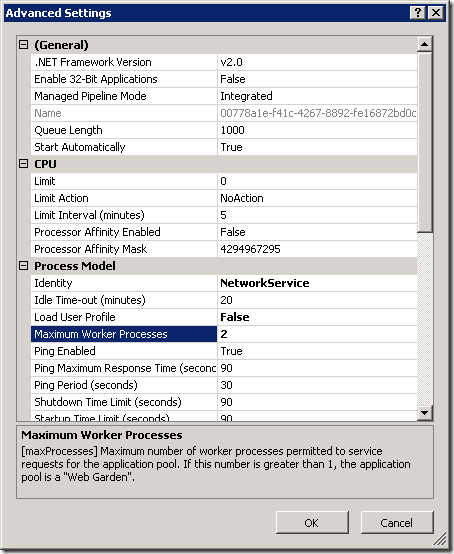
- Right click on the Application Pool for your Node application and select Advanced Settings – your application pool will be the one that has Applications = 1 on the far right of the table; and lastly
- Scroll down to Maximum Worker Processes and check the value – in the screenshot below I’m running on a pair of Medium Azure instances, which have two cores each and thus two processes.
And voila, you’re done.
Let me know if you have any questions!


