Getting Started
This guide will walk you through creating your first Termina application.
Prerequisites
- .NET 10 SDK or later
- A terminal emulator (Windows Terminal, iTerm2, or any terminal with ANSI support)
Create a New Project
bash
# Create a new console application
dotnet new console -n MyTerminaApp
cd MyTerminaApp

# Add Termina package
dotnet add package TerminaUnderstanding the Pattern
Termina uses an MVVM pattern with three key pieces:
- ViewModel - Manages state with
ReactiveProperty<T>, handles keyboard input, and provides navigation/shutdown actions - Page - Builds the UI layout from state, manages focus for modals and interactive controls
- Host - Wires everything together with routing and dependency injection
Example: Counter Demo
Here's a complete working example from the Termina demos.
The counter demo from demos/Termina.Demo.RegionBased.
The ViewModel
The ViewModel manages state with ReactiveProperty<T> — a value holder that is also an Observable<T>, enabling automatic UI updates:
csharp
// Copyright (c) Petabridge, LLC. All rights reserved.
// Licensed under the Apache 2.0 license. See LICENSE file in the project root for full license information.

using R3;
using Termina.Input;
using Termina.Reactive;

namespace Termina.Demo.RegionBased;

/// <summary>
/// ViewModel for the counter demo.
/// Demonstrates reactive properties with the v2 rendering infrastructure.
/// </summary>
public class CounterViewModel : ReactiveViewModel
{
    public ReactiveProperty<int> Count { get; } = new(0);
    public ReactiveProperty<string> StatusMessage { get; } = new("Press Up/Down to change count, Enter to submit message, Escape to quit");
    public ReactiveProperty<string> InputText { get; } = new("");
    public ReactiveProperty<List<string>> Messages { get; } = new(new());

    public override void OnActivated()
    {
        // Subscribe to keyboard input
        Input.OfType<IInputEvent, KeyPressed>()
            .Subscribe(HandleKeyPress)
            .DisposeWith(Subscriptions);
    }

    private void HandleKeyPress(KeyPressed key)
    {
        switch (key.KeyInfo.Key)
        {
            case ConsoleKey.UpArrow:
                Count.Value++;
                StatusMessage.Value = $"Incremented to {Count.Value}";
                break;

            case ConsoleKey.DownArrow:
                Count.Value--;
                StatusMessage.Value = $"Decremented to {Count.Value}";
                break;

            case ConsoleKey.Enter:
                if (!string.IsNullOrWhiteSpace(InputText.Value))
                {
                    var newMessages = new List<string>(Messages.Value)
                    {
                        $"[{DateTime.Now:HH:mm:ss}] {InputText.Value}"
                    };
                    // Keep last 8 messages
                    if (newMessages.Count > 8)
                        newMessages.RemoveAt(0);
                    Messages.Value = newMessages;
                    InputText.Value = "";
                    StatusMessage.Value = "Message sent!";
                }
                break;

            case ConsoleKey.Backspace:
                if (InputText.Value.Length > 0)
                    InputText.Value = InputText.Value[..^1];
                break;

            case ConsoleKey.Escape:
                Shutdown();
                break;

            default:
                // Handle printable characters for input
                if (key.KeyInfo.KeyChar >= 32 && key.KeyInfo.KeyChar < 127)
                {
                    InputText.Value += key.KeyInfo.KeyChar;
                }
                break;
        }
    }

    public override void Dispose()
    {
        Count.Dispose();
        StatusMessage.Dispose();
        InputText.Dispose();
        Messages.Dispose();
        base.Dispose();
    }
}ReactiveProperty<T>
ReactiveProperty<T> provides:
- A
.Valueproperty for reading and writing state - Built-in
Observable<T>— subscribe directly in your Page for reactive bindings - Built-in
DistinctUntilChanged— only emits when the value actually changes
All ReactiveProperty<T> instances must be disposed in your ViewModel's Dispose() method.
The Page
The Page builds the UI as a tree of layout nodes with reactive bindings:
csharp
// Copyright (c) Petabridge, LLC. All rights reserved.
// Licensed under the Apache 2.0 license. See LICENSE file in the project root for full license information.
using R3;
using Termina.Extensions;
using Termina.Layout;
using Termina.Reactive;
using Termina.Rendering;
using Termina.Terminal;
namespace Termina.Demo.RegionBased;
/// <summary>
/// Page for the counter demo.
/// Demonstrates the declarative layout API with reactive bindings.
/// </summary>
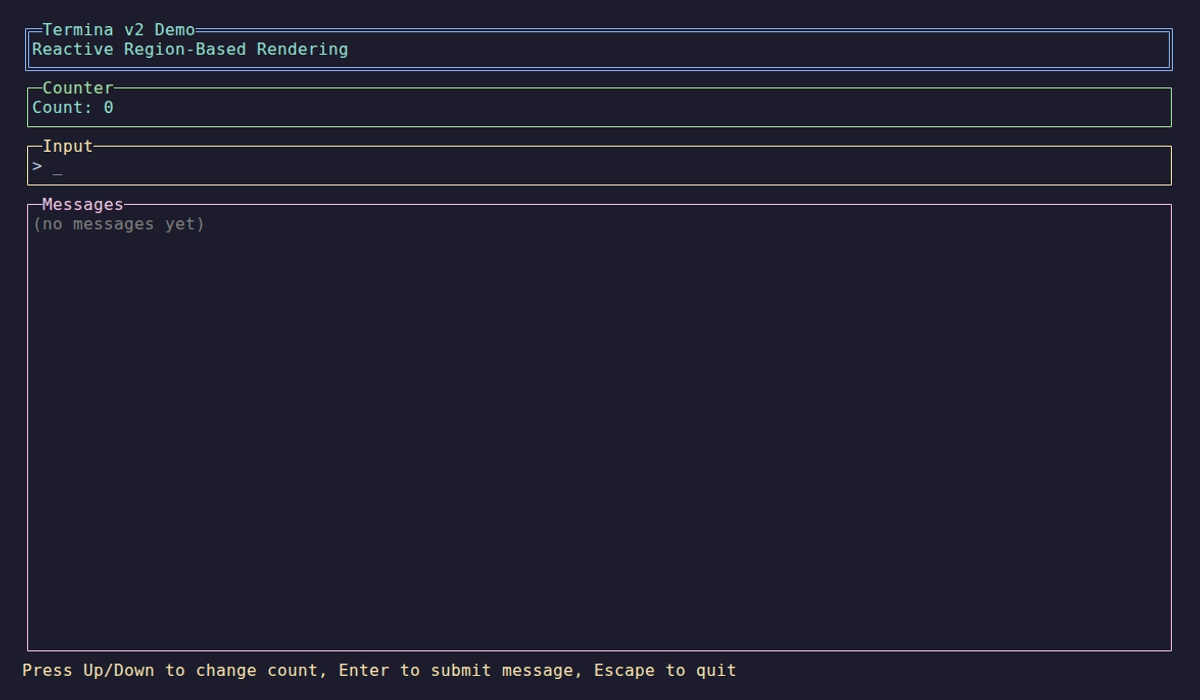
public class CounterPage : ReactivePage<CounterViewModel>
{
public override ILayoutNode BuildLayout()
{
return Layouts.Vertical()
// Header panel
.WithChild(
new PanelNode()
.WithTitle("Termina v2 Demo")
.WithBorder(BorderStyle.Double)
.WithBorderColor(Color.Blue)
.WithTitleColor(Color.BrightCyan)
.WithContent(
new TextNode("Reactive Region-Based Rendering")
.WithForeground(Color.Cyan))
.Height(3))
// Counter display - reactive binding
.WithChild(
new PanelNode()
.WithTitle("Counter")
.WithBorder(BorderStyle.Single)
.WithBorderColor(Color.Green)
.WithContent(
ViewModel.Count
.Select<int, ILayoutNode>(count => new TextNode($"Count: {count}")
.WithForeground(Color.BrightCyan))
.AsLayout())
.Height(3))
// Input panel - reactive binding (NoWrap for single-line input)
.WithChild(
new PanelNode()
.WithTitle("Input")
.WithBorder(BorderStyle.Single)
.WithBorderColor(Color.Yellow)
.WithContent(
ViewModel.InputText
.Select<string, ILayoutNode>(text => new TextNode($"> {text}_")
.WithForeground(Color.White)
.NoWrap())
.AsLayout())
.Height(3))
// Messages panel - reactive binding
.WithChild(
new PanelNode()
.WithTitle("Messages")
.WithBorder(BorderStyle.Single)
.WithBorderColor(Color.Magenta)
.WithContent(
ViewModel.Messages
.Select<List<string>, ILayoutNode>(messages => new TextNode(messages.Count > 0
? string.Join("\n", messages)
: "(no messages yet)")
.WithForeground(Color.Gray))
.AsLayout())
.Fill())
// Status bar at the bottom - reactive binding with instructions
// Note: Height(1) means only 1 row is available - any wrapped text will be clipped
.WithChild(
Layouts.Horizontal()
.WithChild(
ViewModel.StatusMessage
.Select<string, ILayoutNode>(status => new TextNode(status)
.WithForeground(Color.BrightYellow)
.NoWrap()) // Status should truncate, not wrap
.AsLayout()
.Fill())
.WithChild(
new TextNode("[↑/↓] Count [Enter] Send [Esc] Quit")
.WithForeground(Color.BrightBlack)
.NoWrap() // Instructions should truncate at narrow widths
.WidthAuto()) // Take only the width needed
.Height(1));
}
}The Program
Wire it all together with hosting and routing:
csharp
// Copyright (c) Petabridge, LLC. All rights reserved.
// Licensed under the Apache 2.0 license. See LICENSE file in the project root for full license information.

using Microsoft.Extensions.Hosting;
using Microsoft.Extensions.Logging;
using Termina.Demo.RegionBased;
using Termina.Hosting;
using Termina.Input;

// Check for --test flag (used in CI/CD to run scripted test and exit)
var testMode = args.Contains("--test");

var builder = Host.CreateApplicationBuilder(args);

// Suppress host/console logging so it doesn't bleed into the TUI's rendered output.
builder.Logging.SetMinimumLevel(LogLevel.Warning);

// Set up input source based on mode
VirtualInputSource? scriptedInput = null;
if (testMode)
{
    scriptedInput = new VirtualInputSource();
    builder.Services.AddTerminaVirtualInput(scriptedInput);
}

// Register Termina with the tree-based reactive page
builder.Services.AddTermina("/counter", termina =>
{
    termina.RegisterRoute<CounterPage, CounterViewModel>("/counter");
});

var host = builder.Build();

// Test mode - queue up scripted input then quit
if (testMode && scriptedInput != null)
{
    _ = Task.Run(async () =>
    {
        await Task.Delay(100); // Wait for initial render

        // Increment counter
        scriptedInput.EnqueueKey(ConsoleKey.UpArrow);
        scriptedInput.EnqueueKey(ConsoleKey.UpArrow);
        scriptedInput.EnqueueKey(ConsoleKey.UpArrow);
        await Task.Delay(50);

        // Decrement counter
        scriptedInput.EnqueueKey(ConsoleKey.DownArrow);
        await Task.Delay(50);

        // Type a message
        scriptedInput.EnqueueString("Hello from test!");
        await Task.Delay(50);
        scriptedInput.EnqueueKey(ConsoleKey.Enter);
        await Task.Delay(50);

        // Type another message
        scriptedInput.EnqueueString("Testing reactive v2");
        scriptedInput.EnqueueKey(ConsoleKey.Enter);
        await Task.Delay(50);

        // Quit
        scriptedInput.EnqueueKey(ConsoleKey.Escape);
        scriptedInput.Complete();
    });
}

await host.RunAsync();Run the Application
bash
dotnet runYou should see a terminal UI with a counter. Press ↑ to increment, ↓ to decrement, type to add messages, and Escape to quit.
What Just Happened?
- Host Builder - We used
Microsoft.Extensions.Hostingfor application lifecycle management - AddTermina - Registered Termina with the starting route
/counter - RegisterRoute - Associated the route with our Page and ViewModel
- BuildLayout - Defined our UI as a tree of layout nodes
- Reactive Binding -
Count.Select(...).AsLayout()automatically updates the UI whenCount.Valuechanges
Next Steps
- Installation - Learn about package options and dependencies
- Layout System - Understand how layouts work
- Components - Explore all available UI components
- Counter Tutorial - Detailed walkthrough with more features